


目的
DockerでLaravel環境を構築する方法としてはLaradockが有名ですが、Laradockの手順は少し複雑なので今回はそれを使わずにLaravel環境をサクッと構築します。
手順は事前に初期設定スクリプトを含んだ4つのファイルを準備したあと、たったの2コマンドだけでコンテナ作成からLaravelプロジェクト構築、Migrateまで完了です!!
対象
- DockerでLaravel環境を構築したいけど、Dockerの使い方が分からないDocker初心者のかた
- Laradockを試して(手順を確認してみて)みたけど意外と構築に時間かかるやんけ、と思ったかた
- Laravelを試してみたいけどLaravel環境構築するのに手間をかけたくない。とりあえずは、Migrate設定までされたLaravel環境が欲しい、と思っているかた
構築環境
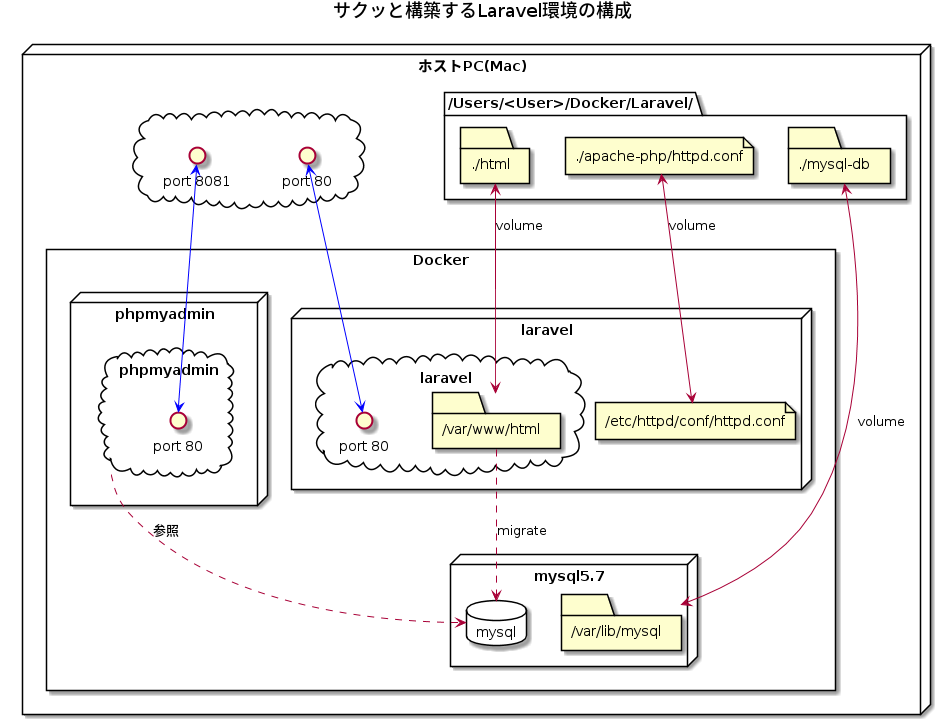
- Docker for Mac を使ってLaravel(apache+php) / Mysql(5.7) / phpMyadminの3コンテナを作成します。
- ホスト側環境
- Mac OS Catalina
- Docker 19.03.5 / docker-compose 1.21.1
- 掲示板アプリを作成しようと思っていたので今回の例では、Laravelプロジェクト名とデータベース名を「board」にしています。パスワードなどは以下の通りとします。
- Laravel環境:
- Laravelプロジェクト名:board
- データベース名:board
- Mysql接続ユーザー:root
- rootパスワード:P@ssw0rd
- URL(Laravel) : http://localhost/
- URL(phpMyAdmin) : http://localhost:8081/
- システム環境:
- Laravel6.0
- PHP7.4
- Apache2.0
- Mysql5.7
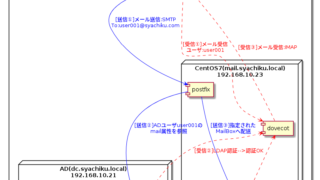
最終的な構成図
最終的な構成図を先に表示すると以下のようになります。plantUMLで作ってみました。
必要ファイルを準備
それでは構築に必要なファイルを用意します。最終的なディレクトリ構成は以下のようになります。ファイルとしては①Dockerfile、②httpd.conf、③docker-compose.yml、④01-laravel-setup.shの4つのファイルが必要です。
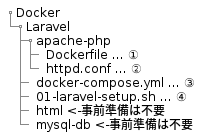
まずは入れものとなるディレクトリとファイル作ります。Dockerディレクトリを作成後、以下のコマンドでLaravel/apache-phpおよび空のファイルを作成します。
$ cd Docker
$ mkdir -p Laravel/apache-php
$ touch docker-compose.yml
$ touch 01-laravel-setup.sh
$ touch apache-php/Dockerfile
$ touch apache-php/httpd.conf
次にそれぞれのファイルの内容をコピペしていきます
①./apache-php/Dockerfile
FROM centos:centos7

# アップデート&必要パッケージのインストール
RUN rpm --import http://mirror.centos.org/centos/RPM-GPG-KEY-CentOS-7
RUN rpm --import http://dl.fedoraproject.org/pub/epel/RPM-GPG-KEY-EPEL-7
RUN yum -y update && yum clean all
RUN yum -y install epel-release
RUN yum -y install http://rpms.remirepo.net/enterprise/remi-release-7.rpm
RUN yum -y install httpd
RUN yum -y install --enablerepo=remi,remi-php74 php php-cli php-common php-devel php-fpm php-gd php-mbstring php-mysqlnd php-pdo php-pear php-pecl-apcu php-soap php-xml php-xmlrpc
RUN yum -y install zip unzip

# Composerのインストール
RUN curl -sS https://getcomposer.org/installer | php
RUN mv composer.phar /usr/local/bin/composer

WORKDIR /var/www/html

CMD ["/usr/sbin/httpd","-D","FOREGROUND"]
②./apache-php/httpd.conf
-> このファイルはデフォルトのhttpd.conf同じ内容のものを準備します。このファイルはあとで初期スクリプトで設定を書き換えます。
#
# This is the main Apache HTTP server configuration file.  It contains the
# configuration directives that give the server its instructions.
# See <URL:http://httpd.apache.org/docs/2.4/> for detailed information.
# In particular, see
# <URL:http://httpd.apache.org/docs/2.4/mod/directives.html>
# for a discussion of each configuration directive.
#
# Do NOT simply read the instructions in here without understanding
# what they do.  They're here only as hints or reminders.  If you are unsure
# consult the online docs. You have been warned.
#
# Configuration and logfile names: If the filenames you specify for many
# of the server's control files begin with "/" (or "drive:/" for Win32), the
# server will use that explicit path.  If the filenames do *not* begin
# with "/", the value of ServerRoot is prepended -- so 'log/access_log'
# with ServerRoot set to '/www' will be interpreted by the
# server as '/www/log/access_log', where as '/log/access_log' will be
# interpreted as '/log/access_log'.

#
# ServerRoot: The top of the directory tree under which the server's
# configuration, error, and log files are kept.
#
# Do not add a slash at the end of the directory path.  If you point
# ServerRoot at a non-local disk, be sure to specify a local disk on the
# Mutex directive, if file-based mutexes are used.  If you wish to share the
# same ServerRoot for multiple httpd daemons, you will need to change at
# least PidFile.
#
ServerRoot "/etc/httpd"

#
# Listen: Allows you to bind Apache to specific IP addresses and/or
# ports, instead of the default. See also the <VirtualHost>
# directive.
#
# Change this to Listen on specific IP addresses as shown below to
# prevent Apache from glomming onto all bound IP addresses.
#
#Listen 12.34.56.78:80
Listen 80

#
# Dynamic Shared Object (DSO) Support
#
# To be able to use the functionality of a module which was built as a DSO you
# have to place corresponding `LoadModule' lines at this location so the
# directives contained in it are actually available _before_ they are used.
# Statically compiled modules (those listed by `httpd -l') do not need
# to be loaded here.
#
# Example:
# LoadModule foo_module modules/mod_foo.so
#
Include conf.modules.d/*.conf

#
# If you wish httpd to run as a different user or group, you must run
# httpd as root initially and it will switch.
#
# User/Group: The name (or #number) of the user/group to run httpd as.
# It is usually good practice to create a dedicated user and group for
# running httpd, as with most system services.
#
User apache
Group apache

# 'Main' server configuration
#
# The directives in this section set up the values used by the 'main'
# server, which responds to any requests that aren't handled by a
# <VirtualHost> definition.  These values also provide defaults for
# any <VirtualHost> containers you may define later in the file.
#
# All of these directives may appear inside <VirtualHost> containers,
# in which case these default settings will be overridden for the
# virtual host being defined.
#

#
# ServerAdmin: Your address, where problems with the server should be
# e-mailed.  This address appears on some server-generated pages, such
# as error documents.  e.g. admin@your-domain.com
#
ServerAdmin root@localhost

#
# ServerName gives the name and port that the server uses to identify itself.
# This can often be determined automatically, but we recommend you specify
# it explicitly to prevent problems during startup.
#
# If your host doesn't have a registered DNS name, enter its IP address here.
#
#ServerName www.example.com:80

#
# Deny access to the entirety of your server's filesystem. You must
# explicitly permit access to web content directories in other
# <Directory> blocks below.
#
<Directory />
    AllowOverride none
    Require all denied
</Directory>

#
# Note that from this point forward you must specifically allow
# particular features to be enabled - so if something's not working as
# you might expect, make sure that you have specifically enabled it
# below.
#

#
# DocumentRoot: The directory out of which you will serve your
# documents. By default, all requests are taken from this directory, but
# symbolic links and aliases may be used to point to other locations.
#
DocumentRoot "/var/www/html"

#
# Relax access to content within /var/www.
#
<Directory "/var/www">
    AllowOverride None
    # Allow open access:
    Require all granted
</Directory>

# Further relax access to the default document root:
<Directory "/var/www/html">
    #
    # Possible values for the Options directive are "None", "All",
    # or any combination of:
    #   Indexes Includes FollowSymLinks SymLinksifOwnerMatch ExecCGI MultiViews
    #
    # Note that "MultiViews" must be named *explicitly* --- "Options All"
    # doesn't give it to you.
    #
    # The Options directive is both complicated and important.  Please see
    # http://httpd.apache.org/docs/2.4/mod/core.html#options
    # for more information.
    #
    Options Indexes FollowSymLinks

    #
    # AllowOverride controls what directives may be placed in .htaccess files.
    # It can be "All", "None", or any combination of the keywords:
    #   Options FileInfo AuthConfig Limit
    #
    AllowOverride None

    #
    # Controls who can get stuff from this server.
    #
    Require all granted
</Directory>

#
# DirectoryIndex: sets the file that Apache will serve if a directory
# is requested.
#
<IfModule dir_module>
    DirectoryIndex index.html
</IfModule>

#
# The following lines prevent .htaccess and .htpasswd files from being
# viewed by Web clients.
#
<Files ".ht*">
    Require all denied
</Files>

#
# ErrorLog: The location of the error log file.
# If you do not specify an ErrorLog directive within a <VirtualHost>
# container, error messages relating to that virtual host will be
# logged here.  If you *do* define an error logfile for a <VirtualHost>
# container, that host's errors will be logged there and not here.
#
ErrorLog "logs/error_log"

#
# LogLevel: Control the number of messages logged to the error_log.
# Possible values include: debug, info, notice, warn, error, crit,
# alert, emerg.
#
LogLevel warn

<IfModule log_config_module>
    #
    # The following directives define some format nicknames for use with
    # a CustomLog directive (see below).
    #
    LogFormat "%h %l %u %t \"%r\" %>s %b \"%{Referer}i\" \"%{User-Agent}i\"" combined
    LogFormat "%h %l %u %t \"%r\" %>s %b" common

    <IfModule logio_module>
      # You need to enable mod_logio.c to use %I and %O
      LogFormat "%h %l %u %t \"%r\" %>s %b \"%{Referer}i\" \"%{User-Agent}i\" %I %O" combinedio
    </IfModule>

    #
    # The location and format of the access logfile (Common Logfile Format).
    # If you do not define any access logfiles within a <VirtualHost>
    # container, they will be logged here.  Contrariwise, if you *do*
    # define per-<VirtualHost> access logfiles, transactions will be
    # logged therein and *not* in this file.
    #
    #CustomLog "logs/access_log" common

    #
    # If you prefer a logfile with access, agent, and referer information
    # (Combined Logfile Format) you can use the following directive.
    #
    CustomLog "logs/access_log" combined
</IfModule>

<IfModule alias_module>
    #
    # Redirect: Allows you to tell clients about documents that used to
    # exist in your server's namespace, but do not anymore. The client
    # will make a new request for the document at its new location.
    # Example:
    # Redirect permanent /foo http://www.example.com/bar

    #
    # Alias: Maps web paths into filesystem paths and is used to
    # access content that does not live under the DocumentRoot.
    # Example:
    # Alias /webpath /full/filesystem/path
    #
    # If you include a trailing / on /webpath then the server will
    # require it to be present in the URL.  You will also likely
    # need to provide a <Directory> section to allow access to
    # the filesystem path.

    #
    # ScriptAlias: This controls which directories contain server scripts.
    # ScriptAliases are essentially the same as Aliases, except that
    # documents in the target directory are treated as applications and
    # run by the server when requested rather than as documents sent to the
    # client.  The same rules about trailing "/" apply to ScriptAlias
    # directives as to Alias.
    #
    ScriptAlias /cgi-bin/ "/var/www/cgi-bin/"

</IfModule>

#
# "/var/www/cgi-bin" should be changed to whatever your ScriptAliased
# CGI directory exists, if you have that configured.
#
<Directory "/var/www/cgi-bin">
    AllowOverride None
    Options None
    Require all granted
</Directory>

<IfModule mime_module>
    #
    # TypesConfig points to the file containing the list of mappings from
    # filename extension to MIME-type.
    #
    TypesConfig /etc/mime.types

    #
    # AddType allows you to add to or override the MIME configuration
    # file specified in TypesConfig for specific file types.
    #
    #AddType application/x-gzip .tgz
    #
    # AddEncoding allows you to have certain browsers uncompress
    # information on the fly. Note: Not all browsers support this.
    #
    #AddEncoding x-compress .Z
    #AddEncoding x-gzip .gz .tgz
    #
    # If the AddEncoding directives above are commented-out, then you
    # probably should define those extensions to indicate media types:
    #
    AddType application/x-compress .Z
    AddType application/x-gzip .gz .tgz

    #
    # AddHandler allows you to map certain file extensions to "handlers":
    # actions unrelated to filetype. These can be either built into the server
    # or added with the Action directive (see below)
    #
    # To use CGI scripts outside of ScriptAliased directories:
    # (You will also need to add "ExecCGI" to the "Options" directive.)
    #
    #AddHandler cgi-script .cgi

    # For type maps (negotiated resources):
    #AddHandler type-map var

    #
    # Filters allow you to process content before it is sent to the client.
    #
    # To parse .shtml files for server-side includes (SSI):
    # (You will also need to add "Includes" to the "Options" directive.)
    #
    AddType text/html .shtml
    AddOutputFilter INCLUDES .shtml
</IfModule>

#
# Specify a default charset for all content served; this enables
# interpretation of all content as UTF-8 by default.  To use the
# default browser choice (ISO-8859-1), or to allow the META tags
# in HTML content to override this choice, comment out this
# directive:
#
AddDefaultCharset UTF-8

<IfModule mime_magic_module>
    #
    # The mod_mime_magic module allows the server to use various hints from the
    # contents of the file itself to determine its type.  The MIMEMagicFile
    # directive tells the module where the hint definitions are located.
    #
    MIMEMagicFile conf/magic
</IfModule>

#
# Customizable error responses come in three flavors:
# 1) plain text 2) local redirects 3) external redirects
#
# Some examples:
#ErrorDocument 500 "The server made a boo boo."
#ErrorDocument 404 /missing.html
#ErrorDocument 404 "/cgi-bin/missing_handler.pl"
#ErrorDocument 402 http://www.example.com/subscription_info.html
#

#
# EnableMMAP and EnableSendfile: On systems that support it,
# memory-mapping or the sendfile syscall may be used to deliver
# files.  This usually improves server performance, but must
# be turned off when serving from networked-mounted
# filesystems or if support for these functions is otherwise
# broken on your system.
# Defaults if commented: EnableMMAP On, EnableSendfile Off
#
#EnableMMAP off
EnableSendfile on

# Supplemental configuration
#
# Load config files in the "/etc/httpd/conf.d" directory, if any.
IncludeOptional conf.d/*.conf
③docker-compose.yml
Laravelプロジェクト名を変更したい場合には、19行目にある「board」を書き換えてください。
version: "3"
services:
  web:
    build:
      context: ./apache-php
    ports:
      - 80:80
    links:
      - mysql
    privileged: true
    volumes:
      - ./html:/var/www/html/
      - ./apache-php/httpd.conf:/etc/httpd/conf/httpd.conf
    container_name: "laravel"
  mysql:
    image: mysql:5.7
    environment:
      - MYSQL_ROOT_PASSWORD=P@ssw0rd
      - MYSQL_DATABASE=board
    ports:
      - 3306:3306
    volumes:
      - ./mysql-db:/var/lib/mysql
    container_name: "mysql5.7"

  phpmyadmin:
    image: phpmyadmin/phpmyadmin
    environment:
      - PMA_ARBITRARY=1
      - PMA_HOST=mysql
      - PMA_USER=root
      - PMA_PASSWORD=P@ssw0rd
    links:
      - mysql
    ports:
      - 8081:80
    container_name: "phpmyadmin"
④01-laravel-setup.sh
この初期セットアップスクリプトでLaravelプロジェクト作成、httpd.conf修正、.env修正、Migrateまで実施します。
こちらも同様にLaravelプロジェクト名を変更したい場合には、4行目にある「board」を書き換えてください。
#!/bin/sh

# Laravelプロジェクト名/DB名
PROJECT=board
# DB Password
PASSWORD=P@ssw0rd

# Laravelプロジェクトを作成
docker exec -it laravel composer create-project "laravel/laravel=6.0.*" $PROJECT
docker exec -it laravel /bin/bash -c "cd /var/www/html/$PROJECT; chmod -R 777 ./storage; chmod -R 777 ./bootstrap/cache/"

# httpd.confをバックアップ後、Document Rootなどを書き換え
cp ./apache-php/httpd.conf ./apache-php/httpd.conf.bk
sed -i -e "s/DocumentRoot \"\(.*\)\"/DocumentRoot \"\/var\/www\/html\/$PROJECT\/public\"/g" ./apache-php/httpd.conf
sed -i -e "s/\<Directory \"\/var\/www\/html\">/\<Directory \"\/var\/www\/html\/$PROJECT\/public\"\>/g" ./apache-php/httpd.conf
sed -i -e "s/AllowOverride None/AllowOverride All/" ./apache-php/httpd.conf

# .envのDB設定を書き換え
docker exec -it laravel /bin/bash -c "cd /var/www/html/$PROJECT; sed -i -e \"s/DB_HOST=\(.*\)/DB_HOST=mysql/g\" .env"
docker exec -it laravel /bin/bash -c "cd /var/www/html/$PROJECT; sed -i -e \"s/DB_DATABASE=\(.*\)/DB_DATABASE=$PROJECT/g\" .env"
docker exec -it laravel /bin/bash -c "cd /var/www/html/$PROJECT; sed -i -e \"s/DB_PASSWORD=\(.*\)/DB_PASSWORD=$PASSWORD/g\" .env"

# Laravel Migrate実行
docker exec -it laravel /bin/bash -c "cd /var/www/html/$PROJECT; php artisan migrate"

# Laravelコンテナの再起動
docker restart laravel
以上で準備完了です。次に実際に構築します。
1コマンド目:Dockerコンテナ作成
次に実際に構築します。1コマンド目としてDocker/Laravelフォルダに移行後、docker-composeコマンドを実行します。
$ docker-compose up -d --buildこのコマンドではDocker Imagesのダウンロード+セットアップをした後、Dockerコンテナを作成、起動まで実行しています。
Docker Imagesのダウンロード+セットアップに少し時間がかかりますが、私の環境では5分ほどで終わりました。
コマンドが正常に完了すると3つのコンテナが作成されています。
bash-3.2$ docker ps
CONTAINER ID        IMAGE                      COMMAND                  CREATED             STATUS              PORTS                               NAMES
c62ffdaf377c        phpmyadmin/phpmyadmin      "/docker-entrypoint.…"   4 minutes ago       Up 4 seconds        0.0.0.0:8081->80/tcp                phpmyadmin
9fa426b90c05        laravel_web                "/usr/sbin/httpd -D …"   4 minutes ago       Up 4 seconds        0.0.0.0:80->80/tcp                  laravel
a4a15debc6d8        mysql:5.7                  "docker-entrypoint.s…"   4 minutes ago       Up 5 seconds        0.0.0.0:3306->3306/tcp, 33060/tcp   mysql5.7
2コマンド目:Laravelセットアップ、Migrateまで
次に初期セットアップスクリプトを実行します。
$ ./01-laravel-up.sh このコマンドではLaravelプロジェクト作成、httpd.conf修正、.env修正、Migrateまで実施します。
Laravelプロジェクトのダウンロードに少し時間がかかりますが、こちらも大体5分ほどで終わりました。
コマンドが正常に完了するとLaravel環境構築が完了です。最後に確認したいと思います。
動作確認
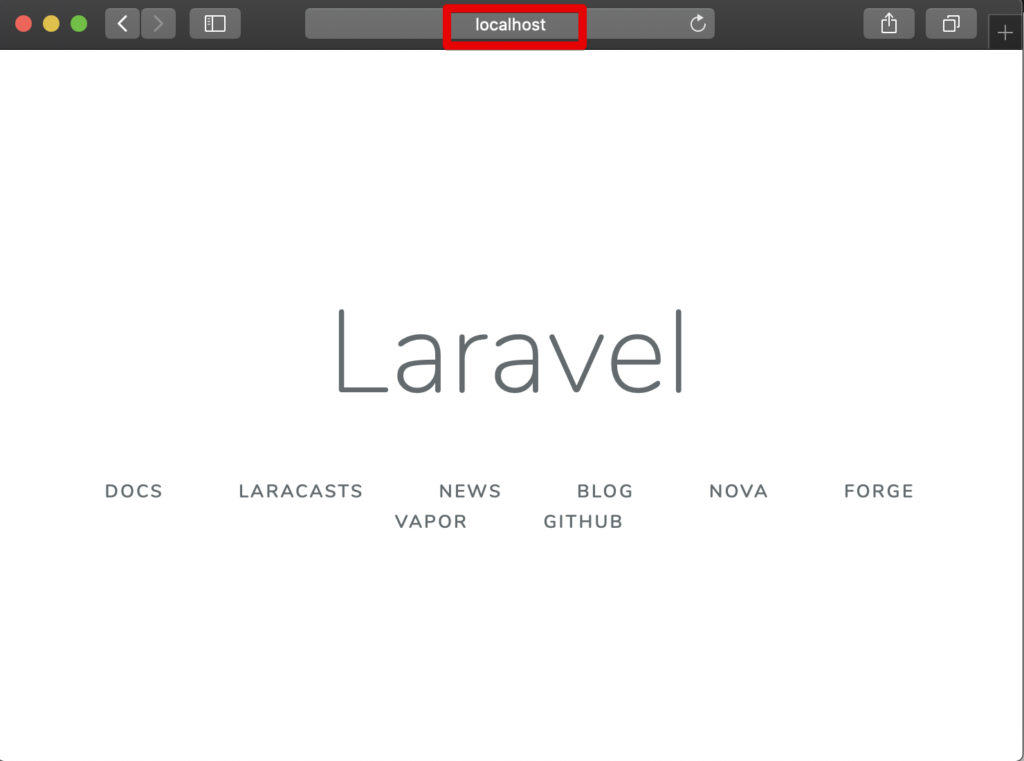
まず、Laravelプロジェクトが作成されていることを確認します。
http://localhost/
にアクセスしてみてください。Laravelの初期画面が表示されます。
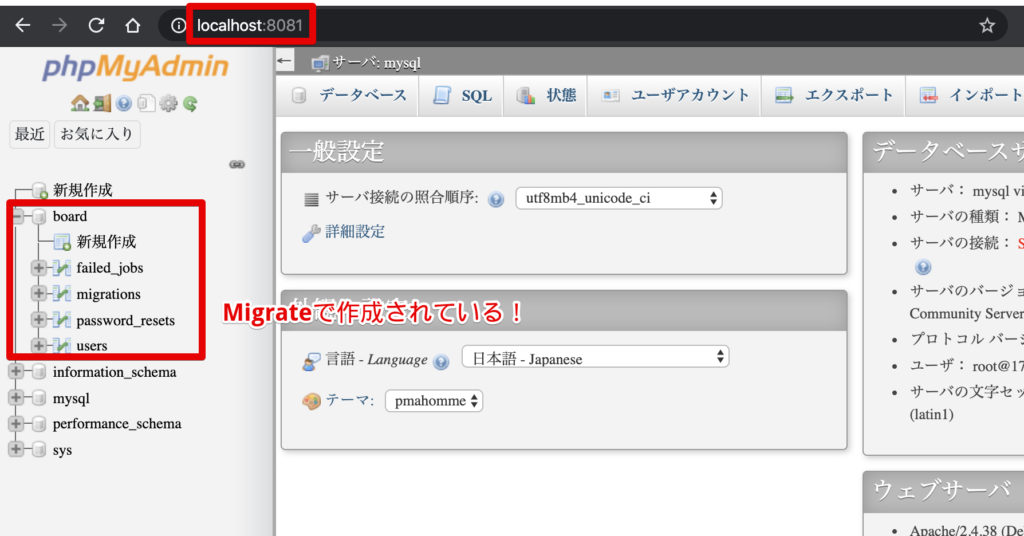
次に正常にデータベースのMigrateが正常に完了していることを確認します。
http://localhost:8081
にアクセスします。
phpMyAdminへアクセスができたら、データベースにMigarateが成功した際に作成されるpassword_resetsなどのテーブルが作成されていることを確認します。
まとめ
やはりDockerは便利ですね!
これまで私が面倒だと思っていたLaravel環境の構築の自動化ができるようになりました。
この内容を読者の環境に合わせていくことで用意に複数メンバーのLaravel開発環境の統一や、テスト環境をサクッと構築することができるようになるため是非とも活用してください!!
Dockerのオススメ勉強方法
私がオススメするDocker初心者向けの最初に購入すべき書籍は「さわって学ぶクラウドインフラ docker基礎からのコンテナ構築」です。
さわって学ぶクラウドインフラ docker基礎からのコンテナ構築
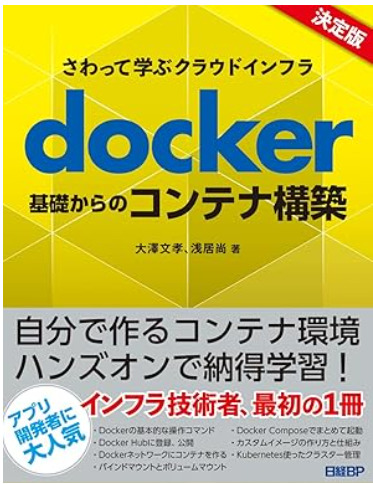
本書ではDockerの基本的な概念などの座学ももちろんありますが、実際に、Dockerのインストール方法やWebサーバーをコンテナで構築するハンズオンを通じて学習することができるため、特に初心者の方はは分かりやすい内容となっています。
以上です。
コメント